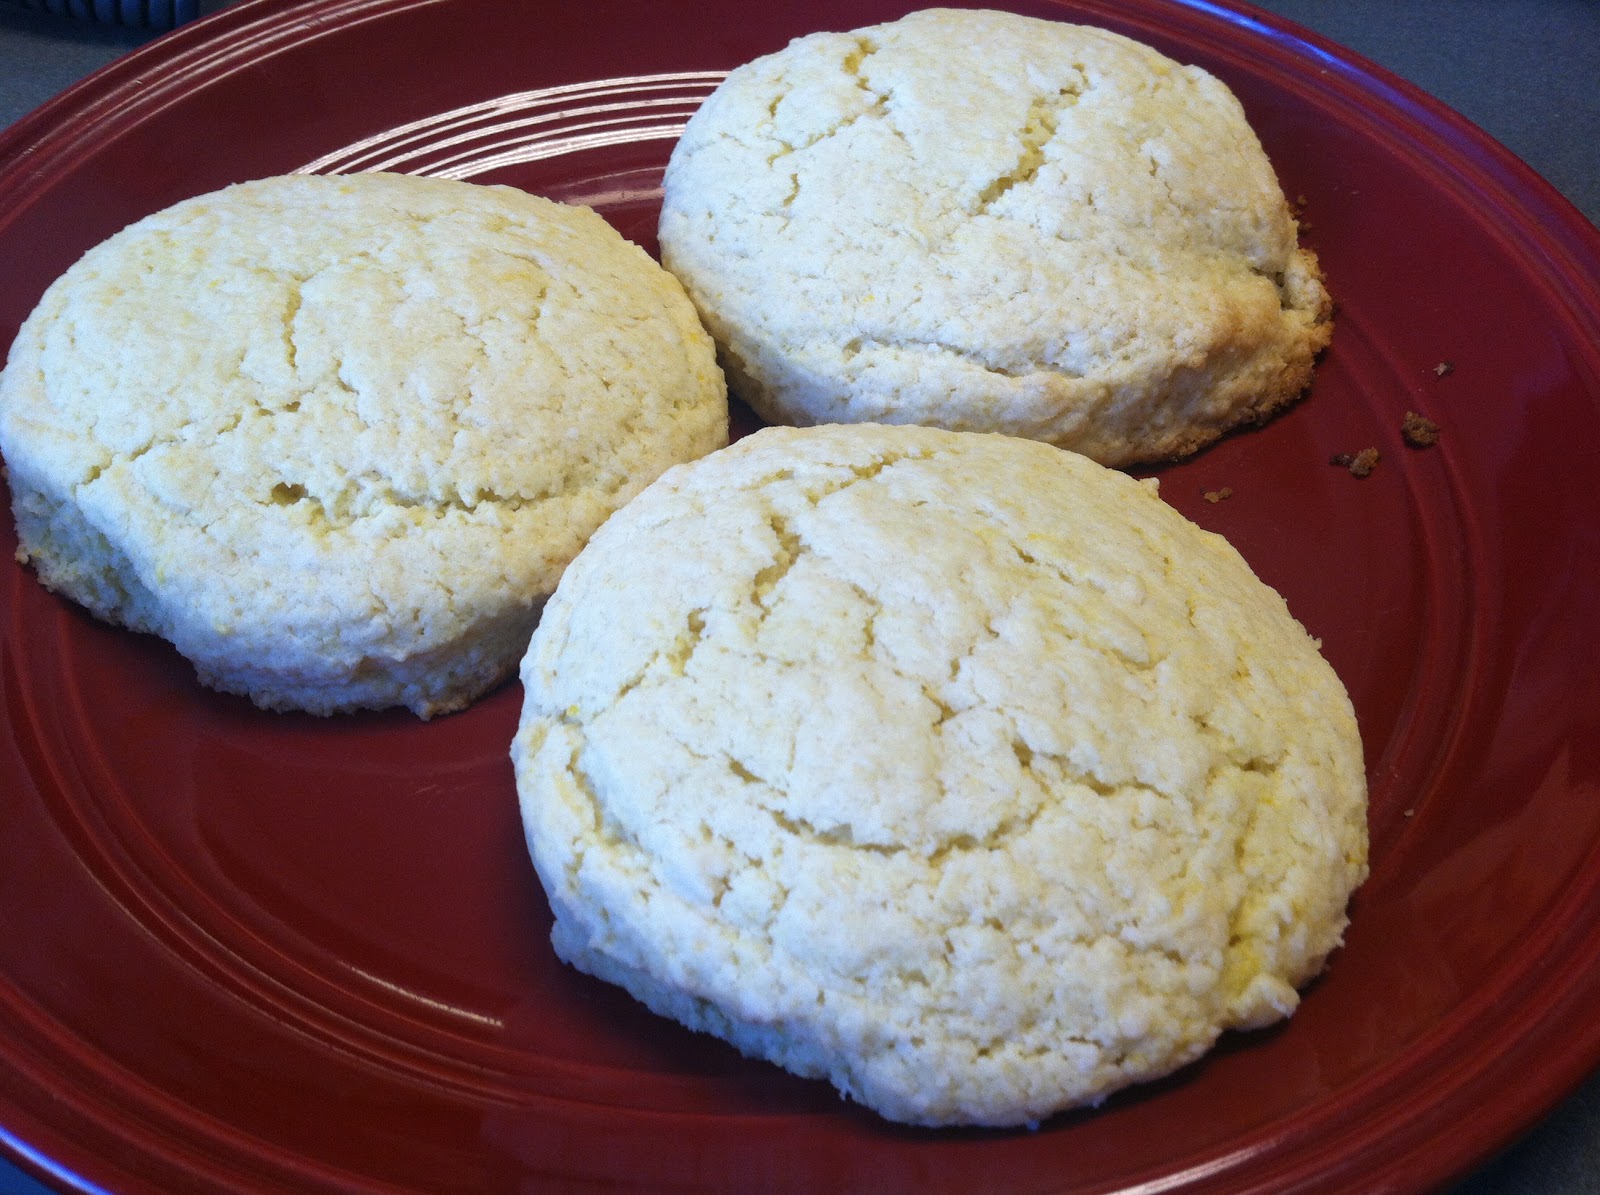
Hello all! As promised, I have another dessert recipe for you guys! Even though the holiday season has passed, I still love working with sweet potatoes & came up with this recipe one night when I realized I didn't have the ingredients for a pie. Thank goodness this worked better than I expected!!
They turned out really well, and remind me of the biscuits that the English's Chicken restaurant in my hometown (hey Salisbury!) makes. These are not the same, but they do fill the craving that I often get for those biscuits. I hope you guys enjoy this recipe!
1 29-oz. can of sweet potatoes
3 cups all-purpose flour
1 cup sugar
2 tsp salt
1 tbsp cinnamon
1 1/2 sticks cold butter, cubed
1. Preheat the oven to 425 degrees F. Grease a baking sheet, then set aside.
2. Place the dry ingredients in a large mixing bowl & stir well to combine.
3. Making sure that the butter is cold, cut it into the dry mix with a pastry cutter, 2 forks, or your hands.
4. Drain the sweet potatoes, then add them to the mixture and mix well.
5. On a lightly floured surface, roll the dough out to about 1/4" thick, then cut out the biscuits using the cookie cutter of your choice; place them on the prepared baking sheet.
6. Place the biscuits in the oven and bake them until they are golden brown around the edges, about 15-30 minutes (depending on their size). Allow them to cool slightly before serving.
I love these biscuits so much, and they can be served in several ways. My favorites? I can eat them all day with a little cinnamon sugar compound butter! I hope you try this recipe, and let me know how it turns out! Remember, live life and eat well!
Saturday, November 3, 2012
A Crisp for Pears...? YES.
Hello all! I hope that everyone on the East Coast is getting back into the swing of things after Hurricane Sandy last weekend; my heart goes out to those directly affected by it, and I'm praying for all of you!
Pear Crisp:
1 can of pears
1/4 cup all-purpose flour
3 tbsp of granulated sugar
1/2 tbsp butter
1.) Preheat the oven to 425 degrees F.
2.) Cut pears into pieces and place them into 2 ramekins (or small oven-proof bowls). Place into a baking pan.
3.) Place the dry ingredients into a bowl; stir to combine. With a fork, cut the butter into the dry ingredients. (Basically, mash the butter into the dry ingredients until the butter is broken up into small pieces.)
4.) Sprinkle the topping onto the pears, then place into the oven and bake for 25 minutes, or until golden-brown on top. Allow to cool slightly before adding the caramel.
Caramel topping: (makes a lot, so if necessary cut this recipe in half!)
1/4 cup granulated sugar
1/4 cup of water
1 tbsp butter
2 tbsp of heavy cream, plus more if needed
1.) In a small saucepan, combine the water and sugar over medium heat.
2.) Cook the mixture until it turns a light golden color. Be very careful; once this mixture starts to turn yellow, it progresses really fast to burnt so turn off the heat when the color is somewhat lighter than what you'd consider done.
3.) Add the butter to the mixture and allow to melt, then add the heavy cream; stir to combine. If needed, add more cream to achieve the right consistency.
4.) Drizzle on top of the crisps, then dig in!
PSA: I'm working on trying to make weekly posts, so bear with me until I can get this together! Thanks for the support, you're awesome :-)
Since we are in the season of fall, and on the cusp of winter, I figured that a nice warm dessert is in order; usually, this crisp is made with apples, but surprisingly it's actually better with pears! Just to make things a little more interesting, I also added a drizzle of caramel on top and it turned out AMAZINGLY! (Gotta love when a plan comes together :-) ) This dessert is seriously easy; you can easily substitute apples, peaches, or whatever fruit you desire for the pears (the decision on whether or not to add the caramel is completely your call). I will feature apples in a later segment, and will make a twist on the typical apple crisp then, so I won't cover the history of the recipe this time. (Don't worry, it's coming though!) Let me know what you think of this recipe in a comment, and remember: Live life, and eat well!
Pear Crisp:
1 can of pears
1/4 cup all-purpose flour
3 tbsp of granulated sugar
1/2 tbsp butter
1.) Preheat the oven to 425 degrees F.
2.) Cut pears into pieces and place them into 2 ramekins (or small oven-proof bowls). Place into a baking pan.
3.) Place the dry ingredients into a bowl; stir to combine. With a fork, cut the butter into the dry ingredients. (Basically, mash the butter into the dry ingredients until the butter is broken up into small pieces.)
4.) Sprinkle the topping onto the pears, then place into the oven and bake for 25 minutes, or until golden-brown on top. Allow to cool slightly before adding the caramel.
Caramel topping: (makes a lot, so if necessary cut this recipe in half!)
1/4 cup granulated sugar
1/4 cup of water
1 tbsp butter
2 tbsp of heavy cream, plus more if needed
1.) In a small saucepan, combine the water and sugar over medium heat.
2.) Cook the mixture until it turns a light golden color. Be very careful; once this mixture starts to turn yellow, it progresses really fast to burnt so turn off the heat when the color is somewhat lighter than what you'd consider done.
3.) Add the butter to the mixture and allow to melt, then add the heavy cream; stir to combine. If needed, add more cream to achieve the right consistency.
4.) Drizzle on top of the crisps, then dig in!
PSA: I'm working on trying to make weekly posts, so bear with me until I can get this together! Thanks for the support, you're awesome :-)
Thursday, October 18, 2012
A Sweet Little Tart
I don't know about y'all, but when it comes to desserts, pies and tarts are definitely among my top favorites - if I could get my dad's key lime pie for every birthday for the rest of my life, rather than a cake, I'd be a happy girl. That being said, it's only natural that a tart recipe would be the first in my tribute to the lovely pear. I've gotta say that this was the first time I'd made a tart from scratch, and it turned out much better than I'd expected. This recipe is designed to be very easy to make; honestly, the hardest part is waiting for the dough to set-up, but the results are definitely worth it!! I hope you enjoy this recipe, and let me know what other types of recipes you'd like to see me post.
Sweet Tart Crust
1 1/2 cups of all-purpose flour
1/2 cup granulated sugar
1 tsp salt
8 tbsp cold butter, cubed
1 egg
1 cup ice water
1.) Sift the dry ingredients (flour, sugar, salt) into a large mixing bowl.
2.) Using a fork, pastry cutter, or your fingers, rub the butter into the dry ingredients until the butter becomes pea sized or a little smaller. I suggest using a fork for this, because the heat from your hands can melt the butter (making a huge mess), and a pastry cutter doesn't necessarily need to be bought.
3.) Add the egg and water to the dough, and mix until it becomes too hard for you to stir; form the dough into a flat disk, and cover with plastic wrap.
4.) Refrigerate the dough for 30 minutes, or freeze the dough for 10 minutes. Either way, make sure that the dough has time to set up.
5.) Flour a flat surface, then roll the dough out until it's about 1/8 inch thick; cut out rounds with a 2 inch cookie cutter. You are now ready to assemble the tarts.

1 or 2 cans of sliced pears
Honey or apricot preserves (optional)
1.) Preheat the oven to 350 degrees F.
2.) Drain the pears thoroughly, then arrange them on the dough rounds any way that you'd like. Make sure to leave the edges of the dough free, then fold the dough up over the pears and press down to seal it.
3.) Place the tarts on a floured or greased baking sheet, then bake for 45 minutes or until the dough has turned golden brown.
4.) Warm the honey or preserves, then use a pastry brush (or drizzle) the topping onto the tarts, then serve once they've cooled somewhat.
Remember: live life and eat well!

Sunday, July 29, 2012
A Souffle By Any Other Name...
Oh, the souffle - light and airy, sweet or savory, but with the reputation of being tough to make; this couldn't be further from the truth. The souffle has two main components: a base made with egg yolks and flavorings, and whipped egg whites, which provide the lift. While in the oven, the air from the egg whites allows for the souffle to rise, but also causes it to fall somewhat once it leaves the oven. The word souffle in French means "puffed up" (an accurate term), that was invented in France during the late 18th century. The initial souffle recipe was for a Souffle au Fromage, or cheese souffle.
There are a few key recipes that I wanted/want to perfect by the end of the summer; this is one of those dishes, and I must say that I'm very happy with the result. You can serve this with a custard sauce, a good dusting of confectioner's sugar, or on it's own if you underbake it ever so slightly. The main thing to keep in mind, is that the bowl and whisk for the egg whites must be clean, otherwise they won't whip up properly. For those of you wondering how exactly a souffle is able to rise, feel free to visit the second source on this page, which gives an in-depth explanation of the rising mechanism. Also, you can change this recipe to use whatever fruit, chocolate, or savory flavoring your heart desires. Live life, and eat well!

Orange Souffle (makes 4)
(Adapted from Mark Bittman's recipe in How to Cook Everything)
2 eggs, separated
Juice & zest of 1 Valencia orange
1/2 cup of granulated sugar
1.) Preheat oven to 350 degrees F. Rub the inside of the ramekins with butter, then place about 1-2 tablespoons of sugar in the ramekins and swirl to coat. Tap out the excess sugar, as needed.
2.) Place the egg yolks into a medium mixing bowl; add the sugar and whisk together until the yolks lighten up in color and become thick (when the whisk is taken out of the bowl, the yolks should fall in a thick ribbon back into the bowl). Add the juice and zest, then set aside.
3.) Place the whites in another medium mixing bowl; whip until they hold stiff peaks when the beater is taken out. Take a little bit of the whites and add it to the yolk mixture, to lighten it; then, add the rest of the whites and fold to incorporate thoroughly.
4.) Divide the mix between the ramekins, then place them into a large baking pan to make transfer easier. Bake for about 15-20 minutes, or until the mix has risen and set up.

Some things to keep in mind: when you first add the whites to the yolks, the mixture will look really runny; don't be discouraged, it gets better once you add the rest of the whites in. Also, don't stir the second addition of whites, otherwise you'll beat the air out of the mix and it won't rise. Hope you'll give this a try! Live life, and eat well!!
Sources:
The Inspired Table
Visiting France
Wednesday, July 25, 2012
An Orange-Kissed Scone You'll Love
I think I've fallen in love...with a scone. Yes, a scone. Fluffy like a biscuit, but considerably lighter (and not so much like butter), a scone is a wonderful, pillowy morsel that pairs spendidly with tea and honey. I love bread of all sorts, but the scone is quickly becoming my favorite. Of course, it can be served with clotted (or whipped) cream, butter and jam - the serving options are pretty similar to biscuits. I can tell that a lot more of these will be made in the near future.
Considered a British teatime staple, the scone actually originated in Scotland; it was usually made with oats, and cooked on a griddle. However, today's scones are usually made with flour, along with a leavening agent, and baked in an oven; they are often an accompaniment to afternoon tea in England. The term scone most likely was derived from the Dutch word schoonbrot or German word schonbrot ('fine bread'); however, it could also have evolved from the Gaelic word sgon, which means 'wide mouthful'. The word scone was first found printed in the Aeneid in 1513.
The scone became a part of the English afternoon tea thanks to the The Duchess of Bedford, who had ordered for some sweet bread to be brought to her along with her tea. She liked it so much that it became a daily ritual, and this has been the tradition ever since. However you choose to serve them, scones are simple and delicious, and should be eaten soon out of the oven!!

based on Alton Brown's scone recipe
2 cups all-purpose flour
4 tsp baking powder
3/4 tsp salt
1/3 cup of sugar
Zest of 1 orange
8 tbsp (1 stick) cold butter
3/4 cup heavy cream
1 egg
1.) Preheat the oven to 400 degrees F. Line a baking sheet with parchment paper or a Silpat liner.
2.) This next step can be done two different ways:
~ Combine the first 5 ingredients in a large mixing bowl. Cut in the butter with your hands, a fork, or a pastry cutter. Add the egg to the heavy cream and beat briefly to combine, then add to the dry ingredients.
~ Add the dry ingredients to the bowl of a food processor. Cut the butter into pieces and add to the dry ingredients; pulse until the texture resembles coarse breadcrumbs or small peas. Add the heavy cream, then allow the processor to mix the dough until it just comes together.
3.) Turn the dough out onto a floured surface and knead for 5 minutes, then roll out and cut into desired shapes.
4.) Place the scones onto the prepared baking sheet, then put into the oven for about 15-20 minutes, or until lightly golden brown.
I chose to make these scones completely by hand, with wonderful results - my orange was a Valencia, and perfumed them wonderfully. I ate them with honey, and enjoyed every bit. However, I also used salted butter when I made these (since it was all i had at the time), but if you are watching your sodium intake, I'd strongly suggest using unsalted butter instead. Live life, and eat well!
Sources:
History of Scones and Griddle-cakes
Scones: A Short History
Sunday, July 1, 2012
Creamy Orange Curd
For the first recipe to highlight the second Spotlight's On! ingredient, I am offering something that is pretty simple to make: orange curd. This wonderful spread is great on toast or yogurt for breakfast, as well as used in creme puffs (where it's a very tasty and not-too-sweet addition), and as a pie/tart/gallette filling. Other possibilities are of course available; use it like you would a marmalade or jam. Without further ado, here's my recipe for an easy orange curd.

Creamy Orange Curd
The juice and zest of 1 medium to large Navel orange
3 tbsp. butter
1 large egg
1 large egg yolk
1/2 cup sugar
1. Place all of the ingredients in a small saucepan; stir to combine.
2. On low heat, stir the mixture frequently until it thickens to your liking and begins to boil, at least slightly.
3. Strain the mixture into a glass jar or bowl, and allow to cool to room temperature.
4. Place plastic wrap over it (pressing it down so it comes into contact with the surface of the curd), and place in the refridgerator for at least 45 minutes. Once it has cooled, it is ready to use.

And there you have it! This post is short, sweet and to the point, but I hope that you find it useful. One thing to note, is that I used a spatterguard and a wooden spoon to strain the mixture, because the colander that I have has spaces that are too large to serve as an effective strainer in this case. (Don't judge me. I see your stares. lol) The wooden spoon helps to speed up the process. Live life, and eat well!


Tuesday, June 5, 2012
Alfredo sauce, from me to you
I have 3 words to describe last week: What a WEEK! Man, I never fully realized how difficult moving would be - UHaul trucks, storage, having a shortage of help (but wonderful friends that did all they could to help out at the last minute). Lots of things went wrong, but the end result worked out fine - plus, I'm finally out of housing "limbo": looking at places, but not having anything actually secured. Since last summer, I've really been getting a taste for what the real world is like; renting an apartment and paying bills for the first time was quite an experience. Through all of the tears, headaches, and even slight rage at times, I've had fantastic people as a support system, and parents that were very concerned and wanted to make sure that I had what I needed. In addition, I've learned a lot about what NOT to do the next time around. Thank goodness it's over with, and I can relax a little bit before I move again into my new place (yay!!!).

In the meantime, I tried thanking the people that helped me out by making them a massive spaghetti dinner; although it didn't work out, I'm going to try again when I move next week. Although I couldn't make everything from scratch (either due to time, or expense of ingredients), one thing I did want to make was my special Alfredo sauce, which I found to be surprisingly easy to pull together. Later in the summer, I hope to experiment with a tomato sauce but that's for another post.
This version is much tastier than the usual storebought brand, and is a little bit healthier because you know exactly what's going into it. Essentially, this is a béchamel sauce made with milk and enhanced with parmesan cheese; substitute with cheddar cheese for the perfect mornay sauce for mac & cheese!! To make it, you need 4 ingredients (not counting pepper), and about 10 minutes - that's it! Keep in mind that salt isn't necessary to add here, because the cheese has salt in it already.

My Alfredo Sauce
1 tablespoon Roasted Garlic butter, softened
1 tablespoon all-purpose flour
1/2 cup of whole milk (or light cream if you prefer)
1/4 cup of parmesan cheese, or more to taste
Pepper to taste
1. Preheat a medium saucepan on medium high heat; add the garlic butter. Meanwhile, cook the accompanying pasta and reserve about 1/2 cup of the pasta cooking liquid.
2. Once the butter has melted, add the flour and stir together vigorously to form a roux; when the mixture turns a very light brown (blonde) color, add the cream and continue stirring to work out the lumps.
3. Cook the sauce until the cream has reduced and the roux has melted into the sauce; add the cheese and stir some more. Add about 1/4 tsp of pepper, taste, then add more if needed. If the sauce is too thick at this point, add some of the pasta cooking liquid to thin it out.
4. Once the sauce is the right consistency, plate your pasta and pour the sauce over top. Stir well, then enjoy!

A little messy, but SOOOOOO good - yummmmm!!
Saturday, May 26, 2012
Aioli for everybody!!!
So, if you made my recipe for Roasted Garlic, then you're now left with a bunch of garlic that needs to be used. Never fear!! I have plenty of recipes to help with this wonderfully delicious issue. After the garlic has been roasted, it takes on a flavor profile that is distinct, yet reminiscent of its raw counterpart. This makes it marvelous for use in various condiments to accompany dishes, one of which is the aioli (recipe shown below).
Aioli is very similar to mayonnaise, in that it is essentially an emulsion of egg and oil, and becomes a creamy condiment that is perfect for sandwiches. However, aioli has a much more pronounced flavor than mayo; it is usually made with olive oil and garlic, with other ingredients added into it, suc as red pepper flakes. Since this is the case, aioli is also delicious served alongside seafood, or veggies (both raw and cooked); it originated in the Provence region of France, and the name comes from ail ("garlic") and oli ("oil"). Usually, fresh garlic is used to make aioli, however my version uses roasted garlic for a more complex flavor. So, without further ado, here's my recipe for aioli, made two different ways.

Roasted Aioli (makes about 1/2 cup)
1 egg yolk
1 cloves of roasted garlic
Juice of 1 lemon
1 tsp mustard (I used a spicy brown mustard, but any good mustard will do)
1/4 cup of olive oil
1/4 tsp paprika
Salt & pepper to taste
By hand:
Place garlic in the bottom of a medium-sized bowl, and crush it with a little salt to form a paste. Add the mustard, lemon juice, paprika, pepper, and egg yolk to the bowl, mix well with a whisk. Slowly pour in the oil, whisking all the while, until the sauce becomes a thick and creamy emulsion. Taste, and season with salt and pepper, or lemon juice as needed. Place in a clean jar or other container, and refrigerate for about 30 minutes before using; this allows the flavors to mingle and mellow out.
By machine:
Place all of the ingredients except for the oil in a food processor; turn on briefly to combine the ingredients. With the motor running, slowly stream in the oil through the feed tube until the sauce becomes a thick and creamy emulsion. Taste, and season with salt and pepper, or lemon juice, as needed.
Note: depending on how you plan to serve the aioli, feel free to add a tablespoon of one or more fresh herbs to the mix; a teaspoon of honey could also be an interesting addition.

So here's an idea for how to use the aioli: (for 1 person) place 8 quartered baby red potatoes in enough salted water to cover them. Bring up to a boil, and cook until the potatoes are able to be easily pierced with a fork, about 15 minutes or so. Once cooked, drain the potatoes and mash them with 1/4 cup of light cream, 1 tablespoon of butter, and 1 tablespoon of the aioli. You will be amazed at how much flavor the aioli gives the potatoes, even though not much of it is needed! The recipe for the chicken thighs you see here will be shared in a later post. Live life and eat well!
Sources:
Friday, May 25, 2012
My favorite compound butter and oil
Hello everyone!! In honor of the inaugural Spotlight's On! ingredient, garlic, I want to share with you my favorite compound butter and flavored oil recipes. These items can be used in a variety of different ways, and just add a little something special to the dishes you use them in. For the compound butter, I love to smooth it onto a freshly toasted piece of bread for a snack, or to top a steak; as it melts, it gives a wonderful flavor that is better than plain butter. I mainly use the oil to make scrambled eggs; although most people I know use onions, cheese and other ingredients to flavor their eggs, I find that the oil, salt and pepper seasons the eggs plenty. Both of these recipes, however, require roasted garlic - I will share the recipe for this first.
Easy Roasted Garlic
One head of garlic
1/4 cup of good olive oil
Heavy pinch of salt
1.) Line a baking sheet with aluminum foil; preheat the oven to 425 degrees F.
2.) Remove the top of the garlic and place it on the baking sheet; you can also break the cloves apart and put them on the baking sheet if you'd like for them to cook faster.
3.) Sprinkle the olive oil onto the garlic; season with salt and bake for (cloves) or (whole head). Bake for 20-25 minutes. Allow to cool, then use or store in the refrigerator with a little more oil.

Once you've taken the garlic out of the oven and allowed it to cool, you can use it as you see fit. Roasting softens the garlic's texture and allows for it to carmelize; honestly, you could spread it onto bread by itself and it would be delicious. However, let's just make it a little more interesting:
My Favorite Compound Butter
4 tablespoons softened butter
2 cloves roasted garlic
1 teaspoon honey
Mix all the ingredients together with a fork in a small bowl. If you'd like, place in some plastic wrap, roll into a log and place in the refrigerator to harden. Otherwise, just place it in a small container and use as needed.

For the oil, there isn't really too much of a recipe: simply take a clean glass jar, and place two cloves of roasted garlic in it, along with 1/2 cup olive oil. As it sits, the garlic flavor diffuses into the oil and makes it taste even better than it normally does. Also, I've used raw garlic for this oil as well, and it also gives wonderful results - try both to see which works better for you!!

I hope that these recipes are helpful, and be on the lookout for more uses of the roasted garlic from the first recipe!! Love life, and eat well!
Easy Roasted Garlic
One head of garlic
1/4 cup of good olive oil
Heavy pinch of salt
1.) Line a baking sheet with aluminum foil; preheat the oven to 425 degrees F.
2.) Remove the top of the garlic and place it on the baking sheet; you can also break the cloves apart and put them on the baking sheet if you'd like for them to cook faster.
3.) Sprinkle the olive oil onto the garlic; season with salt and bake for (cloves) or (whole head). Bake for 20-25 minutes. Allow to cool, then use or store in the refrigerator with a little more oil.

Once you've taken the garlic out of the oven and allowed it to cool, you can use it as you see fit. Roasting softens the garlic's texture and allows for it to carmelize; honestly, you could spread it onto bread by itself and it would be delicious. However, let's just make it a little more interesting:
My Favorite Compound Butter
4 tablespoons softened butter
2 cloves roasted garlic
1 teaspoon honey
Mix all the ingredients together with a fork in a small bowl. If you'd like, place in some plastic wrap, roll into a log and place in the refrigerator to harden. Otherwise, just place it in a small container and use as needed.
For the oil, there isn't really too much of a recipe: simply take a clean glass jar, and place two cloves of roasted garlic in it, along with 1/2 cup olive oil. As it sits, the garlic flavor diffuses into the oil and makes it taste even better than it normally does. Also, I've used raw garlic for this oil as well, and it also gives wonderful results - try both to see which works better for you!!

I hope that these recipes are helpful, and be on the lookout for more uses of the roasted garlic from the first recipe!! Love life, and eat well!
Saturday, May 19, 2012
My first time: Crepes
Happy Saturday everyone!! I hope that you are having a wonderful start to the weekend; i know that I have so far. My mother graduated yesterday, and I am SOOOOOOO proud of her! (Go Mommy!!) I thought I'd share my little culinary epiphany from this morning, before diving into the regular set-up from my last post.
So this morning, I thought to make something different for breakfast. I had heard of crepes before, but had been hesitant to make them myself, because I thought that they would be difficult to make. Boy was I wrong! These lovely little French "pancakes" are actually extremely simple to make. I call them "pancakes" because they are so different from the texture and flavor of the typical American pancake that it wouldn't be right for me to leave the quotation marks off.

It's actually amazing how simple they are, & they will definitely become part of my staple breakfast! I made these sweet crepes with the recipe from Mark Bittman's awesome book How to Cook Everything, but when I develop my own recipe for them, I will be sure to post it here. When I finished making the crepes, I filled them with grape jelly and served them alongside some bacon. Yummy!!!

Crepes are so versatile; with sugar, they can be filled with jams, jellies, marmalades, custards, fruit - the possibilities are vast! Without the sugar, they can be filled with a variety of tasty savory fillings, and can be used to make an easy meal. So, now that I know this, I will be sure to keep experimenting with them. It's amazing how simple something can turn out to be once you go ahead and make it! Thanks for stopping by, and stay tuned for more firsts and recipes. Much love!
Thursday, May 17, 2012
A Lovely Beginning
Hello everyone! This summer is going to be a wonderful culinary experience for me, and I can’t wait to share with you the lovely (and not so lovely…lol) results. I’ve been looking at recipes for a while, and my hands are just itching to try out new recipes. Over the past couple of weeks, I’ve found that I am most relaxed and focused when I have pots and pans going over a hot fire, plus pan(s) in the oven. It’s a wonderful feeling, especially when I can share the finished product with other people; their enjoyment fills me with joy, and I know that I have a passion that can’t be extinguished. With that being said, I look forward to sharing my experiences with various foods from various cultures, and if you see something you like, try it out & let me know how it turns out!!! Hopefully, this will be the start of a beautiful process.
Subscribe to:
Comments (Atom)